Tuesday, February 25, 2020

Mardi Gras dinner at Home

I hosted my first Mardi Gras (Fat Tuesday in french) dinner party at home and had fun preparing these simple southern recipes with a New Orleans theme.


King Cake is a traditional dessert for Mardi Gras and I found this simple recipe variation that is quick and easy with pre-made Pillsbury cinnamon rolls (or you can make your own cinnamon rolls from scratch).  Most King Cake recipes require baker's yeast which I try to avoid because I always seem to be in a hurry.


 Traditional Mardi Gras colors are purple (justice), yellow (power) and green (faith), so I sprinkled the King Cake with these colored sugars and found roses died in the same trio of colors available seasonally from Fifty Flowers shipped from Texas.

 
I found last minute decorations at Party City which complemented the meal.


Our New Orlean's sytle MENU:


Lent is a spiritual time for our family by giving up something I/we love for lent in order to focus more on being thankful for all of God's provisions.  So this festive Fat Tuesday dinner marks the eve of a short 40-day sacrifice in light of God's bounty to us each day.


Sunday, October 18, 2015

Burlap Ribbon Wreath


I fell in love with this wreath when I discovered it on Stonegable's blog last year, and finally got around to making it for fall this year.


It is so simple to make and can be used year round by just changing the embellishments added to the burlap wreath base.

Materials Needed:
  • Wire wreath form (three slat type)
  • Burlap ribbon (20 yards of 4" wide)
  • Fall embellisments
  • Wire to assemble embellishments on wreath

First start by folding your burlap ribbon in thirds and weaving through the wire form.


Pull a loop up throuth each gap in the wire wreath form, and I like to do either 3" or 4" loops.  

It helps tremendously when Chance, our laborador retriever, helps with the assembling.

After each row of three loops, twist the burlap two times and then weave the loops going the opposite direction.  Continue to weave the loops back and forth and make as full or loose as you would like, depending on how full you want for the final look.


The more full you want your wreath, the more burlap material you will need.  Make sure to plan ahead, as I initially started to pack the loop rows tightly for a fuller look and I ran out of burlap. Since I had purchased my ribbon last year, I could not go back and buy more ribbon, so I had to undo all my loops and start over.  My final wreath used two 10-yard spools of 4" ribbon. 

Tuck the end of the ribbon inside the wire form, and secure with wire. After you're done, twist each loop until you get the desired messy look and to cover any wire wreath form that is showing through loop gaps.


I adhered seasonal embellishments with wire (I used pine cones, leaves and fall berries).  That way, you can easily change out these additional decorations for each holiday or season. 


 Happy Fall!


Sunday, September 6, 2015

Homemade Dill Pickles


I usually have a good harvest of cucumbers in my garden, and this year was no exception.  However, numerous cucumbers ripen all at once and you can only eat so many fresh cucumbers in salads.  So, I have been looking for a good dill pickle recipe and found it here on Stonegable's blog.

As is the case for most every recipe I use from Stonegable's blog, this recipe was amazing! I have never made pickles from my cucumbers before and these tasted as good as (if not better than) store bought Klaussen refrigerated dill pickles. 


Ingredients (My slight variation on Stonegable's Easy Garlic Refrigerator Dill Pickle recipe)

Cucumbers
Garlic cloves (keep whole)
Peppercorns
Dill seed
Fresh dill herbs
Vinegar
Water
Pickling salt (available in most stores where canning jars are sold)


Sunday, June 8, 2014

Baked Brown Butter Doughnuts with Chocolate


Since it was National Doughnut Day on Friday, June 6th, I saw so many recipes and blogs celebrating this annual day.  I grew up having Winchell's doughnuts as a special treat and a good cake doughnut is the BEST.  I'll occasionally treat myself to a doughnut (or two) every couple of months, but I had never ever considered making doughnuts myself... until I found baked doughnut recipes.  I am not a fan of frying much of anything, so these baked versions are close enough in taste to my old favorites ... without the oil fat or labor of frying them.

Beware though, once you see how easy these are to make, it could become a frequent craving to bake fresh doughnuts for breakfast most mornings or bring to work for a mid-week "pick-me-up" treat.

So, I bought a doughnut baking pan last week, as I begin my doughnut baking journey.  This is one of those unnecessary kitchen gadgets that I never thought I'd buy... but now I realize it is well worth it!


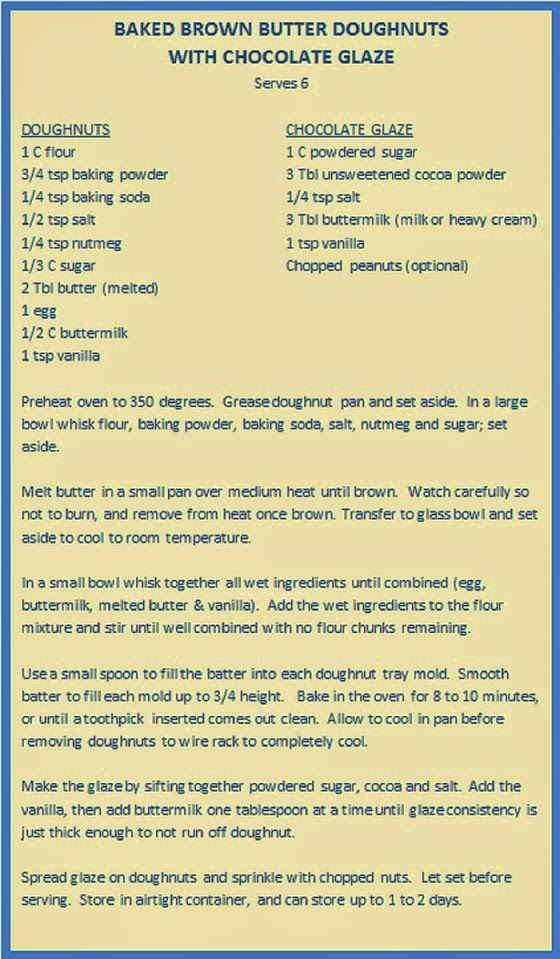
Following is my variation to Joy the Baker's recipe, with ingredients and directions at the bottom of this post.  Check out Joy the Baker's blog for some amazing baking tips on doughnuts and many other baked items.

First melt butter until brown and nutty aroma.  Set aside in a small dish to cool to room temperature.
Note: It's best to melt butter in stainless steel pan, as it's harder to monitor butter color turning brown in dark teflon pan.

Next mix all dry ingredients together in a separate medium size bowl.  Thoroughly mix and set aside.


In a separate smaller bowl, whisk all wet ingredients together until thoroughly mixed.  It's important to let brown butter cool to room temperature, or it will partially cook the egg.


Add the wet ingredients to the dry ingredients and mix until all dry lumps are smoothed out.  Do not over mix the batter or it tends to dry out the doughnuts.  Using a small spoon, scoop the dough into the doughnut tray, filling each form to 3/4 full.  Don't fill too full, or the batter will rise and close up any hole.


While the bottoms are rounded from the mold, the tops are more flat.

Ice the flat side, so the chocolate glaze does not run off down the sides.

Top the chocolate icing with chopped peanuts.


  Let the icing set for a few minutes and you are ready to serve ..... or devour!


My husband approved this recipe, but we both vowed to not eat all six ourselves, which was hard to maintain my will power! National Doughnut Day is always the first Friday in June... so mark your calendar for next year.


Saturday, June 7, 2014

Garden Box for Herbs & Vegetables

We recently cleaned up our backyard planters and I have always wanted to do a vegetable and herb garden. Our dirt is tough and strewn with nearby tree roots, so I made a raised planter box.


First I had to measure the size garden box I wanted for my limited space and determine exact location. Next I had to consider the water source for this area. We have an existing drip system, so I added some drip lines that would exclusively water this garden box.

Materials needed:
  • Wood planks, cut to size (5'x20" was my box area size)
  • L-shape hardware brackets (8 - 2 each x 4 corners)
  • Screw driver (electric tool makes it easy)
Redwood is the preferable wood for outdoor garden boxes. Redwood can be more expensive but the box frame will endure, lasting much longer by withstanding the outdoor elements better over time. However, my local lumber store did not have 12" wide redwood strips in stock at the time.  I wanted a taller box out of one width of wood, plus I wanted to purchase materials and build my garden box the same day, so I settled for using pine wood to achieve my 12" garden box height.  Please note that pine will erode over time, but I only need this garden for one or two summer seasons, as we will eventually re-landscape the back yard.  So pine will suffice for my short-term gardening project. 
Home Depot cut the wood to my desired length at no charge (such a deal), resulting in two 12" wide strips of both 20" and 5' lengths.  This will give me a 20"W x 5'L x 12"H finished box.
You will need 8 braces total to secure the garden box corners with 2 braces per corner.  I purchased 2 packages of L-shape corner braces (4 per bracket).  You can use wider braces, but I do not need this box to endure more than 1-2 summer seasons, so I went the cheap route. Any width brace will work, depending on how long you want your garden box to last.


Secure the brace on the end of one plank by screwing it approximately 3" from the edge of your wood's width.  Repeat approximately 3" from the opposite width's end, so there are two braces on the end as pictured below.  Repeat this on both interior ends of each 5' plank. Note: once you fill the finished planter box with dirt, these braces will be covered by the dirt.


Next you need to connect the 5' piece to the 20" end by drilling screws into existing L-shape brace onto the 20" end.  Make sure to connect so that ends are even, but they still look good if they're not perfect.

Repeat on all inside corners until you have created your 4-sided box.


Here is the end view.


Next you're ready to put the garden box in your yard.


Make sure to place the drip lines under the box, so the lines will be hidden in the soil and not drape over the garden box exterior.

Fill the garden box with soil and compost and you're ready to plant your herbs and vegetables.


I added the the ends of my drip line once my herbs were planted, to specifically direct water spray to each plant.  I also planted some seeds amidst the started herbs, so my garden will bloom in stages over the summer.


Looking forward to cooking with these herbs and vegetables all summer.


Tuesday, May 27, 2014

Warm Fig & Goat Cheese Appetizer

I had the most amazing warm fig appetizer while dining at a five star restaurant nearby a few years ago and have looked on many a menu since then, and have not found anything like it.

So, I begun searching the web and experimented with a couple fig appetizers and this was my favorite.


The original recipe is on Yumsugar website but the ratios were a bit too much goat cheese, so following is my variation with less goat cheese with increase sweet syrup ratio.  The balsamic and honey combination is fabulous!  My photos don't do justice to the rich and decadent flavors, but I promise these are little bites of heaven.


INGREDIENTS:
  • 1 dozen figs
  • 1 Tbls unsalted butter
  • 3 Tbls balsamic vinegar
  • 3 Tbls honey
  • 2 oz fresh goat cheese
  • 1 pinch Kosher salt
Preheat the oven to 400ºF.  While the oven preheats, melt the butter in a small saucepan, along with the balsamic vinegar, honey, and a hefty pinch of salt. Bring to a boil, then reduce to a simmer and cook about 5 minutes, or until slightly thickened.  Place the figs, cut side up, in a baking dish the size of a pie pan. Top each fig half with a 1/2 teaspoon to 1 teaspoon of goat cheese. Drizzle the balsamic vinegar syrup over the figs. Roast in the oven until very soft, 10 to 15 minutes.
Serve on a platter sprinkled with coarse salt.