Showing posts with label Holiday projects. Show all posts

Sunday, October 18, 2015

Burlap Ribbon Wreath


I fell in love with this wreath when I discovered it on Stonegable's blog last year, and finally got around to making it for fall this year.


It is so simple to make and can be used year round by just changing the embellishments added to the burlap wreath base.

Materials Needed:
  • Wire wreath form (three slat type)
  • Burlap ribbon (20 yards of 4" wide)
  • Fall embellisments
  • Wire to assemble embellishments on wreath

First start by folding your burlap ribbon in thirds and weaving through the wire form.


Pull a loop up throuth each gap in the wire wreath form, and I like to do either 3" or 4" loops.  

It helps tremendously when Chance, our laborador retriever, helps with the assembling.

After each row of three loops, twist the burlap two times and then weave the loops going the opposite direction.  Continue to weave the loops back and forth and make as full or loose as you would like, depending on how full you want for the final look.


The more full you want your wreath, the more burlap material you will need.  Make sure to plan ahead, as I initially started to pack the loop rows tightly for a fuller look and I ran out of burlap. Since I had purchased my ribbon last year, I could not go back and buy more ribbon, so I had to undo all my loops and start over.  My final wreath used two 10-yard spools of 4" ribbon. 

Tuck the end of the ribbon inside the wire form, and secure with wire. After you're done, twist each loop until you get the desired messy look and to cover any wire wreath form that is showing through loop gaps.


I adhered seasonal embellishments with wire (I used pine cones, leaves and fall berries).  That way, you can easily change out these additional decorations for each holiday or season. 


 Happy Fall!


Tuesday, December 17, 2013

Rectangle Christmas Wreath

I've seen a lot of creative holiday wreaths and have been wanting to make a new one for the front door this year. I saw this wreath here and liked the rectangular shape as a fresh look.  This is my variation of the wreath which was fairly simple to make.


Materials needed:
  • Wood 1x4 by 8'
  • Wood glue
  • Staple gun with staples
  • Green garland
  • Few sprigs of fresh green branches
  • Burlap ribbon - 4" width (10 yards)
  • Decorative berries
  • Wood letters
I don't have any wood scraps, so I bought an 8' long 1x4" strip of wood at Home Depot and cut it into 4 strips with a jig saw. I cut two 18-3/4" strips and two 24" strips.
I don't possess carpentry skills, but do have a Black & Decker jig saw that comes in handy on various craft projects.  My saw cuts were not perfectly straight so I sanded down the edges a bit, but the imperfect cuts still work out fine since they will be hidden by greenery.

If you have various carpentry tools, you could secure the wood strips together with nails in grooves for smooth framing.  But I used wood glue and staples, which is easy, but you need to allow the glue to dry over night before you cover the wood with greenery.
I used an 8' strand of garland, one roll of burlap ribbon and some berries I had on hand.
 Next you need to secure the green foliage by stapling to the wood with a staple gun. I divided the strand in half stapling the middle of the garland to the midpoint of the bottom strip and stapled the greenery around the wood frame in a way that covers all wood.  Don't worry about wood gaps showing through, as the wired branches can be bent to hide the frame after the garland has been stapled securely around all four sides.
I'm not always a fan of fake greenery, so adding some sprigs of fresh cut greenery like noble fir or spruce gives a more natural look.  I added some initially, securing in place with the wired green garland, and then added a few more as needed after the ribbon was added.

 To attach the burlap ribbon, start by stapling the end to the back of the frame and then wrap around the frame diagonally.
The ribbon will also hide any gaps where wood might still be showing, so you can play around with the positioning of the ribbon before stapling in place. 

Add berries in a few areas with a glue gun and any additional fresh greenery where needed.
 For the letters, I kept them natural for good contrast against our green front door, but you could spray paint them red or add glitter.  You can either staple the letters to a jute string on back, or use a hot glue gun to secure.
Tie or glue to the underneath side at the top of the wood frame.

Finally, make a bow with the burlap ribbon and hot glue to the garland.


It is a bit heavier than standard round fir wreaths, so I needed to secure a larger nail on the front door to accommodate it. I love the results.


Thursday, December 12, 2013

Mason Jar Snow Globe

If it's cold outside and you're looking for a simple Christmas project for any age, this Snow Globe out of a mason jar is perfect!  It's easy, quick to put together and you can be as detailed or minimalistic as you'd like.
 
Following are the materials you will need:
  • Mason jar with lid and band
  • Small Christmas tree
  • Plastic or silk pine greenery
  • Small pine cones
  • Holiday sprigs or berries
  • Any small holiday décor or embelishment
  • Snow flakes (they come in a bag at most craft stores)
  • Glue gun
  • Ribbon or jute


Make sure your mason jar is clean and dry.  You don't want any moisture inside for the snow flakes to stick to the inside of the glass.  I prefer the quart size but the smaller pint size can work as well.

You can use a wide variety of holiday décor, the only requirement is that it has to be small enough to fit in your mason jar. 


Once you choose your materials, glue them in position on the underneath side of the mason jar lid. The items must be secure as you will be turning the lid upside down for globe assembly. Also remember to keep the shape of all décor smaller than the jar so it will fit and not scrunch against the glass.

 
You may need to trim any greenery or holiday branches, but you can always use a glue gun to position branches in the desired position. 
 
Once you are satisfied with your arrangement and the decorations are glued in place, fill the jar with 1/4 inch high of fake snow.  I found the iridescent snow flakes work best as they do not stick to the inside walls of the jar.  Some dust particles in the more natural colored snow flakes will leave some dusty residue on the inside glass.
 
 
 Assemble the lid in place on top of the snow-filled jar, so the décor fits neatly inside your jar (globe).  Screw the mason jar metal band to secure the lid in place.  Add some jute or ribbon around the band for a finishing touch.
Shake the globe upright and you have your own snowy
winter wonderland in a jar (oops globe)!


Wednesday, December 4, 2013

Santa Bucket DIY

I saw this simple holiday idea here sewmanyways blog and had to make it.  I love the simplicity and bright RED color... and it was hard to improve on such a cute idea.


It's super easy and might even be things you already have around the house.  Following is what is needed:
  • Large tin can
  • Black belt
  • Red Spray paint
  • Glue gun

I bought the cheapest large can I could find (6 lb, 9 oz) at Smart & Final for $3.49, since I normally don't buy large restaurant-sized food products.  I used the tomatoes to make some yummy tomato-carrot soup last night (recipe below, if interested), so the ingredients did not go to waste. 


Peel off the paper label and clean off any glue, then spray paint the can red.  It took a couple coats, but dried in half an hour.   Then I glued on the belt and Voila...


You could also use this tin bucket for Christmas cards received, or to store Christmas wrapping paper, but I've put mine in the entryway and like it full of fresh seasonal branches and holly.  You could also make smaller cans and use an old watch band as a belt or cut a belt out of fabric and silver paper for buckle.  The smaller version could make cute table place settings or a pen and pencil holder for notes to Santa.

I cut out Ho-Ho-Ho from black construction paper and outlined with silver glitter. 
If you have time to make one yourself, let me know how it turns out  :)

The healthy and tastey Tomato, Carrot & Rosemary soup recipe follows

Tuesday, December 3, 2013

Gingerbread Houses

I can't believe how fast this year is speeding by ... and I feel so blessed to have married the man of my dreams in October.  Thank you all for sharing in our magical day by either being there with us or sending your thoughts and love our way.

I love a great Christmas project, so am starting our December blog on decorating my first Gingerbread house.  Mom, if we did gingerbread houses growing up, I don't recall, so Tim & I made an evening of decorating houses last night with his nieces, Molly & Emma.

I decided to purchase the pre-made gingerbread house, to save time ... and maybe next year I'll actually "bake" the gingerbread, as I'm sure many of you have done before.  I found boxed sets at Target and Costco for $9.99.  These are the three sets I bought and found Costco's house to be larger with more candy included (far right), which I would recommend to all. Target also had a build-your- own (set on left)... maybe for when I have more time and patience :)


The set included a bag of white frosting and green frosting, but I made additional frosting for all the extra candy I bought. 

FROSTING RECIPE (Kate, I'm sure you have better, but this was quick and easy!)
  1. Blend 1 Cup Powdered sugar to 1 Tbls milk, which you can increase depending on quantity desired.
  2. For stiffer frosting needed (trees below), add 2 Tbls softened butter to above ratio
I didn't realize how much candy already came with the set, so I also scored additional treats at CVS (great prices on sale) and the 99 Cent Store if you make your own house.

I used this Sweetopia blog for her video tutorials in making, assembling & decorating gingerbread houses.  It was a great resource for a first timer or just for new ideas.
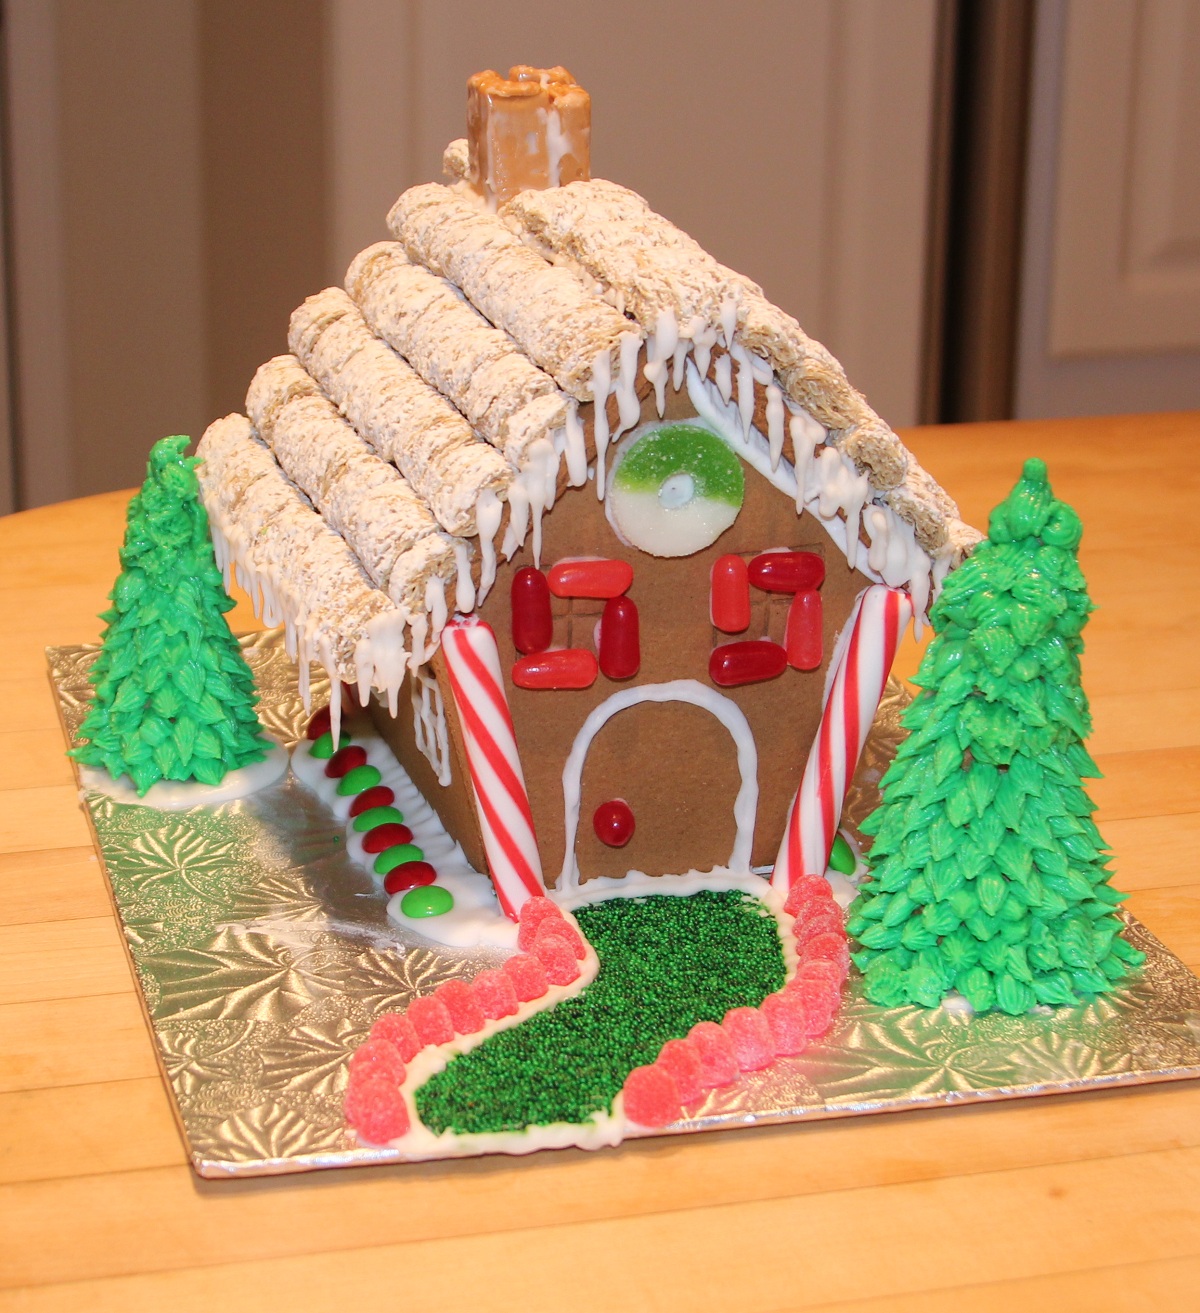
Here is the result of my first decorated Gingerbread House:
I used Kellogg's Frosted Mini-Wheat cereal for my thatched roof and Bit-of-Honey's for the chimney.  Icicles were easy to add with a small tip for the frosting.

This Ice cream cone frosted tree idea is from Sweetopia, as well.  All you need is pointed ice cream cones, green colored frosting and a cake decorating leafor star tip for texture. 
I used the least expensive generic cones, which kept breaking, so I recommend buying namebrand for sturdier quality base to hold the frosting.
Back side
Molly decorating
We had such a fun evening on the last night of November, to start our first married Christmas season in a very festive way... shared with my Husband's (that word sounds so cool) nieces.  Here are Molly and Emma's handiwork with Uncle Tim.

Emma decorating

Emma and Molly's houses
 Let me know if you make a Gingerbread house this year or whether your family has a good Gingerbread house story. 

Wednesday, November 20, 2013

Burlap Placemats DIY

Burlap is popular this season, so I wanted to make something and found these simple placemats at StoneGable and they were so easy (I'm not kidding)!
 
These are great for fall table settings, but all you need to do is change the accents and you could use them year round.  Add some blues and seashells as a center piece and you can use all summer too.
 
All you need is some burlap ribbon (10 yards per place mat), tape measure, scissors and glue gun.  I used 1-1/2" wide burlap ribbon with wired edges for a 13.5" x 18" placemat.  Wired edges gives the ability to reshape when needed and I like a border along the length of the ribbon.
 
Cut 9 pieces of burlap 20" long for the horizontal strips
Cut 12 pieces of burlap 15" long for the vertical strips


Lay all horizontal strips down in rows and weave the vertical strips over one horizontal strip and then under the next until you have woven through all 9 horizontal lengths.  Repeat this with the remaining 12 vertical strips and tighten the strips close together to minimize any gaps.
 
 
I found it easier if I started in the middle and worked from either end.  You will want to leave 1/2" on all ends for gluing. The extra length of each strip allows you to trim the ends to an even measurement after you have completed weaving in case the burlap has frayed during the weaving.
 
To glue the edges underneath, the method depends on whether it's a top row or bottom row edge.  On the strips that end on top of a strip, apply hot glue and fold the strips 'over' and glue underneath on the back side.  For the strips that end the row "under" a strip, first glue the end back on top of the same strip so the fold butts up flush with the outer edge of the strip lying on top.  You then glue this folded end up under the back side of the top layer to give an even edge. 
 
 Even if it's not perfect, it looks good once you add your place settings.


 This was such an easy project and I LOVE the results !!