Showing posts with label Recipes. Show all posts

Sunday, June 8, 2014

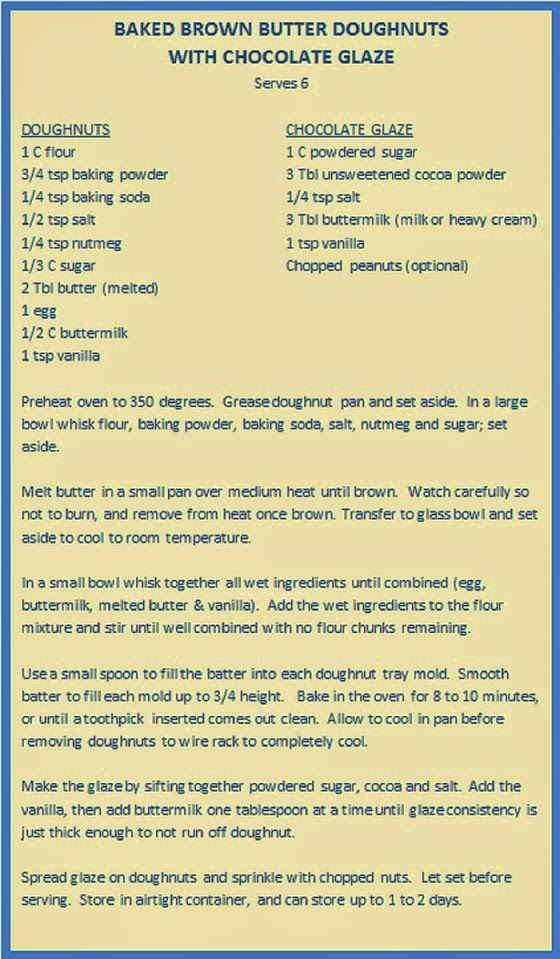
Baked Brown Butter Doughnuts with Chocolate


Since it was National Doughnut Day on Friday, June 6th, I saw so many recipes and blogs celebrating this annual day.  I grew up having Winchell's doughnuts as a special treat and a good cake doughnut is the BEST.  I'll occasionally treat myself to a doughnut (or two) every couple of months, but I had never ever considered making doughnuts myself... until I found baked doughnut recipes.  I am not a fan of frying much of anything, so these baked versions are close enough in taste to my old favorites ... without the oil fat or labor of frying them.

Beware though, once you see how easy these are to make, it could become a frequent craving to bake fresh doughnuts for breakfast most mornings or bring to work for a mid-week "pick-me-up" treat.

So, I bought a doughnut baking pan last week, as I begin my doughnut baking journey.  This is one of those unnecessary kitchen gadgets that I never thought I'd buy... but now I realize it is well worth it!


Following is my variation to Joy the Baker's recipe, with ingredients and directions at the bottom of this post.  Check out Joy the Baker's blog for some amazing baking tips on doughnuts and many other baked items.

First melt butter until brown and nutty aroma.  Set aside in a small dish to cool to room temperature.
Note: It's best to melt butter in stainless steel pan, as it's harder to monitor butter color turning brown in dark teflon pan.

Next mix all dry ingredients together in a separate medium size bowl.  Thoroughly mix and set aside.


In a separate smaller bowl, whisk all wet ingredients together until thoroughly mixed.  It's important to let brown butter cool to room temperature, or it will partially cook the egg.


Add the wet ingredients to the dry ingredients and mix until all dry lumps are smoothed out.  Do not over mix the batter or it tends to dry out the doughnuts.  Using a small spoon, scoop the dough into the doughnut tray, filling each form to 3/4 full.  Don't fill too full, or the batter will rise and close up any hole.


While the bottoms are rounded from the mold, the tops are more flat.

Ice the flat side, so the chocolate glaze does not run off down the sides.

Top the chocolate icing with chopped peanuts.


  Let the icing set for a few minutes and you are ready to serve ..... or devour!


My husband approved this recipe, but we both vowed to not eat all six ourselves, which was hard to maintain my will power! National Doughnut Day is always the first Friday in June... so mark your calendar for next year.


Tuesday, May 27, 2014

Warm Fig & Goat Cheese Appetizer

I had the most amazing warm fig appetizer while dining at a five star restaurant nearby a few years ago and have looked on many a menu since then, and have not found anything like it.

So, I begun searching the web and experimented with a couple fig appetizers and this was my favorite.


The original recipe is on Yumsugar website but the ratios were a bit too much goat cheese, so following is my variation with less goat cheese with increase sweet syrup ratio.  The balsamic and honey combination is fabulous!  My photos don't do justice to the rich and decadent flavors, but I promise these are little bites of heaven.


INGREDIENTS:
  • 1 dozen figs
  • 1 Tbls unsalted butter
  • 3 Tbls balsamic vinegar
  • 3 Tbls honey
  • 2 oz fresh goat cheese
  • 1 pinch Kosher salt
Preheat the oven to 400ºF.  While the oven preheats, melt the butter in a small saucepan, along with the balsamic vinegar, honey, and a hefty pinch of salt. Bring to a boil, then reduce to a simmer and cook about 5 minutes, or until slightly thickened.  Place the figs, cut side up, in a baking dish the size of a pie pan. Top each fig half with a 1/2 teaspoon to 1 teaspoon of goat cheese. Drizzle the balsamic vinegar syrup over the figs. Roast in the oven until very soft, 10 to 15 minutes.
Serve on a platter sprinkled with coarse salt.


Monday, May 26, 2014

Shrimp Cocktail with a Twist

This twist on traditional shrimp cocktail is one of my favorite summer dishes, or any season for that matter.  It can make the perfect appetizer if you serve smaller portions, but we also enjoy as our main course, served together with a bowl of clam chowder.
 

The serving glass presentation also makes it special.  I serve this in an ice cream cone sundae dish, or a martini glass is perfect for an appetizer portion.   I originally found this recipe in the Los Angeles Times newspaper, food section year ago.  I have altered a few ingredients and my recipe variation is below.


I found this tastey ketchup recipe on Portugese Girl Cooks blog. 
Homemade Ketchup 
  • 1 Tbl olive oil
  • 1 medium onion, chopped
  • 3 cloves garlic, minced
  • 1/2 cup apple cider vinegar
  • 1/4 cup red wine vinegar
  • 3/4 cup brown sugar
  • 1 tsp salt
  • 1 tsp dijon mustard
  • 1 – 28 oz can crushed tomatoes, preferably unsalted
Directions:
1. In a medium saucepan,  over medium- high heat, heat the olive oil, add the chopped onion and garlic, and cook for about 5 minutes, until softened. Add both vinegars, sugar, salt, and mustard. Bring to a boil. Add the crushed tomatoes, bring to a boil and reduce the heat to medium low. Continue to cook until the sauce has reduced by about half, about 25 minutes. Remove from the heat and puree in food processor, blender, or with immersion blender (my choice), until smooth.
Can be stored in the refrigerator for 3 weeks.

Sunday, May 18, 2014

Blueberry & Cream Cheese Layered Cake


I saw this cake from The Pioneer Woman, Ree Drummond, and had to make it.  The results did not disappoint.  It was simple to make, and the blueberries balanced out the decadent cream cheese frosting, so it is perfect for a spring brunch or summer celebration.

The three things that made this cake stand apart from the usual recipes was beating the egg whites, using buttermilk and layering with fresh blueberries. Separating the eggs to beat the egg whites until stiff and folding them into the cake batter made the cake a lighter and more airy texture.  So, the cake was not heavy.  The layers and generous portion of fresh blueberries gave it a subtle fruit taste, balancing out the sugar sweetness just right.... and buttermilk always makes any baked dessert (or pancakes for that matter) taste better!!


You can find the original recipe here from the Pioneer Woman, which includes coconut in both the cake and frosting.  However, I dislike the flavor and texture of coconut, so I did not include in my cake version.

Also, if you don't want to buy a carton of buttermilk just to use only one cup for this recipe, the Pioneer Woman shared that you can make 1 cup of buttermilk by combining regular milk and vinegar, with the ratio of 1 cup milk mixed with1 teaspoon vinegar. Who knew?  It actually works!

I made this cake for an office birthday party, and served it with fruit cups and brownies.  It was a big hit!
 

The recipe is below, with a slight variation from The Pioneer Woman's version.  ENJOY!

INGREDIENTS
Cake:
  • 5 eggs, separate egg whites from yolks
  • 1 cube butter (1/2 C)
  • 1 C vegetable oil
  • 1 C sugar
  • 1 Tbl vanilla
  • 2 C flour
  • 1 tsp baking soda
  • 1 tsp baking powder
  • 1 C buttermilk 
Frosting:
  • Two 8-oz pkgs cream cheese
  • 1 cube butter (1/2 C)
  • 2 tsp vanilla
  • 2 lbs powdered sugar
  • 1 C chopped pecans
  • 1-1/2 pints fresh blueberries


CAKE Directions:
Preheat the oven to 350 degrees. Grease and flour two 9-inch round cake pans.

In a small bowl, beat the egg whites until stiff and set aside.

In a mixing bowl, combine the butter, oil and granulated sugar together until creamy.  Once the sugars are combine, add the egg yolks and vanilla and mix thoroughly.

In a separate bowl, sift the flour, baking soda and baking powder. Alternate adding the buttermilk and dry ingredients to the wet ingredients. Mix until just combined, and then fold in the egg whites.
Divide the batter evenly between the two cake pans and bake until a toothpick comes out clean, about 20-25 minutes.  Let the cakes initially cool for 10-15 minutes, remove cakes from their pans and place on wire racks until completely cooled before cutting and assembling.

FROSTING Directions:
Mix the cream cheese, butter, vanilla and powdered sugar in a bowl.  Beat until will combined and the frosting is light and fluffy. Stir in the pecans.

ASSEMBLING:
Cut each cake in half lengthwise. Spread the bottom layer with 1/4 of the frosting and top with blueberries. Repeat this sequence with each layer of cake topped with frosting and blueberries until the 4 layers of cake are complete. Placing blueberries around the edge of each layer is important to maintain layer's structure.  Garnish blueberries on the top of the cake with some pecans for decoration.


Saturday, May 17, 2014

Watermelon & Feta Salad

There's nothing like this refreshing salad to cool down a hot summer day.


We've been having unseasonably hot temperatures in Southern California, where it's been over 95 degrees the past three days.  I usually don't make this watermelon salad until summer has arrived, but it is the perfect side dish on a hot day.

This salad is super easy to make and everyone loves it!! 

The recipe follows, but exact quantities of olive oil and vinegar can be adjusted to taste.  Enjoy!


Friday, April 18, 2014

German Chocolate Cake for a 60th Birthday

My husband turned 60 this week, and his all time favorite cake is German Chocolate.
I've never like coconut, but this recipe from Cooks Illustrated is the BEST German Chocolate cake... guaranteed.


I absolutely love Cooks Illustrated!!! I am recipe follower and need play by play instructions.  Cooks Illustrated has tested many variations of a recipe and explains why their method works, with detailed explanations.  It makes a basic cook, like me, pull off some pretty amazing recipes, as if I was a guest chef on a food network cooking show.

If you go to their test kitchen website here, you can subscribe to an annual $35 membership for access to unlimited recipes.  I highly recommend joining, like I did, as you will use it often.

Their German Chocolate Cake recipe I made for the birthday boy is below .... Enjoy!!

And a Happy 60th Birthday to the love of my life!!
My husband's high school graduation picture, when he was 18 years old.


Tuesday, January 28, 2014

Mom's Chili (Quick & Easy)

With Super Bowl Sunday this weekend, I'll be making my Mom's Chili.  I have some good recipes from scratch, but this chili is from mostly canned ingredients and tastes amazing!


INGREDIENTS
CHILI:
  • 1 lb ground beef
  • 1 Tbl olive oil
  • 1 medium onion (finely diced)
  • 2 cloves garlic (minced)
  • 1 can diced tomatoes
  • 1 can tomato sauce
  • 1 small can tomato paste
  • 1 can pinto beans
  • 1 can kidney beans
  • 1 can Dennison's Chili Con Carne (without beans)
  • 1 tsp chili powder (Add more to taste)

TOPPINGS (Optional):
  • Grated Cheddar or Monterey Jack cheese
  • Sour cream
  • Cilantro
  • Red Onion (diced)
  • Avocado
  • Diced tomatoes


Cook your ground beef in a sauce pan on medium heat until brown, breaking the beef up into small bite sized pieces; drain any oil or fat and set aside.  In a heavy pot, heat olive oil on medium and saute onions until translucent, usually 5 minutes.  Add minced garlic and cook for another 60 seconds.

Add the meat to the onions and season with chili powder, stir and cook for 60 seconds until just combined.  Add all other ingredients and mix together.  Bring to a soft boil then cover with a lid and simmer for 20 minutes, stirring occasionally.

Serve topped with sour cream, grated cheese and cilantro.  Diced red onion and avocados also make great toppings.  Serve hot with corn bread.


Thursday, January 23, 2014

Tomato, Carrot & Rosemary Soup

We're having a bit of a warm winter here in California, but I've been longing for some cooler winter weather and some homemade soup.  I can't do much about the weather, but I can make some winter soup.

I first tasted this soup at Capers Kitchen in West Seattle and it's the perfect variation on your basic tomato soup.  This recipe is simple and tasty, but does require a food processor (or blender) to get it's smooth consistency.  Carrots give it that sweeter flavor while the rosemary accents finish it off perfectly.


Enjoy this on a cozy night with a dollop of sour cream, warm bread and a good movie.  It's feeling like a cold winter's night already!

Monday, January 20, 2014

Pretzel Rods

I was looking for something new for a colorful baby shower dessert type treat, and stumbled upon chocolate dipped pretzel rods on Pinterest.  It looks like these have been around for awhile, although I'd never seen them before, which is another reason I LOVE Pinterest!


INGREDIENTS:
  • Pretzel Rods
  • Candy melts (I prefer Wilton here)
  • Microwave safe container with some depth for dipping pretzels
  • Sprinkles to decorate

First you need to melt your Candy Melts according to microwave instructions on the package.  While you do not need a measuring cup for measuring, I used my microwave safe measuring cup as reference for the depth in dipping my pretzel rods.  The cup was deep enough to cover over 1/3 of the pretzel with vanilla chocolate and helped me keep all pretzel coatings similar in length.


I forgot to take any pictures of the dipping process, but one thing worth sharing is how to keep the dipped pretzel coating smooth while it hardens.  I tested laying the freshly dipped pretzels on wax paper while the candy hardened, but this resulted in the candy coating becoming flat on one side which did not look good.

The solution: Use a container of rice from your pantry to hold the pretzel rods upright while the melted candy hardens smoothly! (I was careful and somehow avoided leaving any blue sprinkles behind in the rice... but I will laugh if little bits of blue sugar show up in any future cooked rice!  :)

It worked best to dip pretzels with melted chocolate first and let them partially dry for a few minutes before covering with the sprinkles.  Once I had covered 3 to 4 pretzels with chocolate, I was able to return to pretzel #1 and add sprinkles, since the chocolate was still soft but not runny.  Otherwise my sprinkles just ran down the wet melted candy.  I could then continue the sequence with 3 to 4 pretzels at a time until all were dipped in chocolate and sprinkles.


To achieve the double drizzled effect, I let the base candy layer completely dry and then placed the hard coated pretzels on wax paper to drizzle the second candy color.  Dip a spoon in the melted chocolate and swing it back and forth over the pretzels for a drizzle pattern.  Once the first drizzled chocolate dries, rotate the pretzel so you can drizzle the back side to complete all around.

It was so fun to work with two colors of candy melt plus two types of sprinkles and end up with so many variations of the two color patterns.
The entire process of candy coating one bag of pretzel rods took only about 2 hours and I was thrilled with the results!

The final color decorated combination worked well with these Square Pretzel treats together on the same table.


Sunday, January 19, 2014

Square Pretzel Treats

I love salty savory flavors mostly, but still have a sweet tooth, so here's the perfect bite size treat that's salty sweet.  Square pretzel snaps topped with chocolate and caramel.
These salty sweet treats are quick and easy, perfect for snacking.  You can also color coordinate for any party treat.  I used Wilton Candy Melts for the chocolate portion which comes in the perfect round shape and various colors.

INGREDIENTS:
  • Square Pretzel snaps
  • Candy melts (Wiltern - vanilla)
  • Caramel squares (optional)
  • M&M's
I bought Wilton Candy Melts at JoAnn's, but you can also find at Party City or Michael's.
Preheat oven to 350 degrees. Place pretzels on a cookie sheet and top each with a round candy melt. 
If you do not wish to add caramel, place the candy covered pretzels in the oven. The candy melt needs to soften, which usually takes at least 1 minute or up to 2 minutes, but cooking time may vary for each oven.  It's best to test your oven by checking every 30 seconds until the candy is just soft.  Do not heat more than 2 minutes or the candy will melt too much, become runny and lose shape.

After you take out of the oven, immediately press an M&M in the center.  Push just enough so it will set.  Don't worry if a few pretzels break, as you will learn how much pressure to add once you test a few times.  Work quickly or have your kids help with this part before the candy melts firm up.

If you're adding the piece of caramel, cut each caramel square into 8 smaller pieces.  For best results with caramel, make sure to cut the caramel square into thin pieces.  I first cut lengthwise and then cut each thin half into quarters for a total of 8 small pieces from each caramel square.  
Cooking or melting usually takes up to 2 minutes if you also add caramel on top. Continue to test timing with your oven, but will need to heat a bit longer than heating with only candy melt.
You will also need to press a bit harder with caramel on top, which is why the thin pieces of caramel help melt similar to candy melting.
It takes about an hour for the candy melts to set, but you can put in the refrigerator for 15 minutes if you're in a hurry to serve. 

If you leave these out on the counter, they will not last long.  They also make a great party compliment to pretzel rods that I made here

Enjoy these colorful salty sweets!